my big fat “greek independence day” green onion pita piemy big fat “greek independence day” green onion pita piemy big fat “greek independence day” green onion pita piemy big fat “greek independence day” green onion pita piemy big fat “greek independence day” green onion pita piemy big fat “greek independence day” green onion pita piemy big fat “greek independence day” green onion pita piemy big fat “greek independence day” green onion pita piemy big fat “greek independence day” green onion pita piemy big fat “greek independence day” green onion pita piemy big fat “greek independence day” green onion pita piemy big fat “greek independence day” green onion pita piemy big fat “greek independence day” green onion pita piemy big fat “greek independence day” green onion pita pie

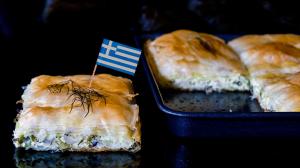
If you’re going to be celebrating something special, you better have a big fat greek pita pie to share with everyone !

As many have heard, a serious and massive refugee situation is going on in Greece. Despite the difficulties that the Greek citizens have been going through these past several years, not to mention the horrible and tragic difficulties that transformed these folks from other countries into refugees in the first place, the Greeks have been  doing their best to deal with the situation and are being as helpful and as welcoming as they possibly can, especially when it comes to food. Many news reports and articles mention the many Greek citizens, preparing homemade food and meals in their domestic household kitchens and bringing it to the refugees ! We should all be that generous … which brings me to my next point.

March 25 or better known as Greek Independence Day, the national holiday celebrated annually in Greece commemorates the start of the War of Greek Independence in 1821. Greece had been part of the Ottoman Empire since 1453. The Greek revolt was precipitated on March 25, 1821, when Bishop Germanos of Patras raised the flag of revolution over the Monastery of Agia Lavra in the Peloponnese and the cry “Freedom or Death” became the motto … the rest is history (my great-great-great-great-grandparents’ family history) ... we’ve moved forward and beyond those days, thankfully !

And finally, a greek traditional dish to accompany this holiday : Pita (not the flatbread but the filo dough pie version). Until recently, I hadn’t realized that I had shown you all how to make smaller, miniature or individually portioned pita pies (see recipes here) but had neglected to also show you how to technically make 1 larger  family-sized pita pie which is much easier and faster to prepare and to share (it just sounds complicated when I explain it, but it’s much easier than folding up or rolling individual pitas). I only used one main filling ingredient, green onions,  that are usually added as an extra to add flavour & depth to spinach pie (spanakopita) and leek pie (prasopita). The principle is simple enough, choosing the filling ingredients (feel free to be créative and to modify it), preparing the filling, combining it with eggs and cheese, buttering and layering the first half of the sheets of paper-thin filo dough, filling it, covering with the second half of the buttered filo sheets, scoring it, baking it … eating/sharing it.

Cooking isn’t just about EATING, it’s about the before & after or the MAKING & the SHARING … :)

my big fat “greek independence day” green onion pita pie

24.03.2016

4

ingredients

  • 600 grams chopped green onions (about 750 grams whole green onions, before chopping and discarding the tougher green ends and roots)
  • 60 ml (¼ cup) olive oil (add 2 more tbsp if necessary)
  • 250 grams feta cheese (or 200 grams feta + 50 grams ricotta or cottage cheese)
  • 125 grams (2-3) eggs
  • 250 grams (10-12 sheets) filo dough
  • 125 ml (½ cup) olive oil and melted butter (clarified or not, I use half butter, half oil)
  • 5 grams (¼ cup) chopped fresh flat-leaf parsley
  • 5 grams (¼ cup) chopped fresh dill
  • 2,5 grams (2 tbsp) chopped fresh mint
  • salt & pepper (to your taste)

instructions

  • chop the green onions into thinner slices (discard the tougher dark green ends and roots)
  • in a large pot, heat up the olive oil and cook the green onions at med-high heat until translucent and softened and add the chopped herbs and set aside to cool down
  • beat the eggs in another bowl and add the crumbled feta cheese and ricotta and/or cottage cheese, mix well by hand
  • combine the creamed egg and cheese mixture with the green onions mixture, taste for saltiness and add extra salt and pepper (to your taste) and set aside
  • melt the butter and combine with the olive oil (or use only butter)
  • unwrap and lay out your stack of sheets of filo dough and cover the stack with a damp cloth to avoid it from drying out
  • generously brush your baking pan with the melted butter and olive oil
  • *note : the baking pan in the photographs measures 36 cm x 27 cm x 2,5 cm, the filo dough sheets each measure 37 cm x 20 cm each
  • lay 2 sheets of filo dough across the baking pan, almost side-by-side but slightly overlapping eachother towards the middle, allow about 5-7cm of filo dough to extend beyond the edges of the roasting pan and brush everything with melted butter and olive oil (do not forget to brush the edges or they will dry out and crumble)
  • lay 2 more sheets of filo dough on top, across the first two sheets, slightly overlapping but in the other direction and brush generously again and add 1-2 final sheets of filo dough towards the center, brush with melted butter again
  • *note : this will create a triple or quadruple layer of buttered filo dough for the base
  • preheat the oven to 190°C
  • pour and spread out the filling inside the filo covered baking dish
  • lay out 2 sheets of filo dough on top of the filling, side-by-side but overlapping eachother much more (do not let too much filo dough extend beyond the edges this time), brush with butter
  • add 2 more additional sheets, in the other direction, overlapping much more and with no extending beyond the baking dish, brush with butter and add 1 final sheet towards the center, brush again
  • fold over the edges (that extended beyond the baking pan), towards the middle and pat down and use a sharp knife to score the top of the pita, going just deep enough to cut entirely through the top layers of filo dough
  • *note : this step is important, otherwise when you attempt to slice it after baking, the top layer will crumble and break apart)
  • sprinkle with some fresh herbs and brush the top with the remaining melted butter mixed with a few drops of water (it will help to crisp it)
  • bake at 190°C for 35-40 minutes, rotating the baking pan once, half-way through
  • loosely cover with aluminum foil for the last 10-15 minutes of oven-baking  time (to avoid the top surface from overbrowning)
  • serve warm or at room temperature
  • *note : avoid placing the pita in the refrigerator because it will get soft/soggy, leave at room temperature and reheat in a hot pre-heated oven at 180°C for 5-7 minutes