mallorcan «ensaïmada» mini easter sweet breadsmallorcan «ensaïmada» mini easter sweet breadsmallorcan «ensaïmada» mini easter sweet breadsmallorcan «ensaïmada» mini easter sweet breadsmallorcan «ensaïmada» mini easter sweet breadsmallorcan «ensaïmada» mini easter sweet breadsmallorcan «ensaïmada» mini easter sweet breadsmallorcan «ensaïmada» mini easter sweet breadsmallorcan «ensaïmada» mini easter sweet breadsmallorcan «ensaïmada» mini easter sweet breadsmallorcan «ensaïmada» mini easter sweet breadsmallorcan «ensaïmada» mini easter sweet breadsmallorcan «ensaïmada» mini easter sweet breadsmallorcan «ensaïmada» mini easter sweet breads

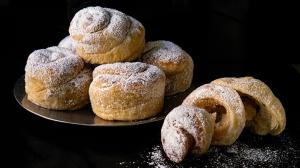
Patience is the defining ingredient of an authentic Mallorcan Ensaïmada. Hailing from Spain's Balearic Islands, this iconic spiral pastry transforms the most basic staples : flour, water, lard, sugar, eggs, and yeast, into an impossibly airy, delicate, and layered treat. 

Its history is as layered as its dough, with likely roots in Moorish Levantine sweets like burek, evidenced by its characteristic "turban" shape. Its name derives from the Catalan word saïm (pork lard), a core ingredient that replaced traditional sheep’s fat during the Spanish Inquisition. At that time, the public consumption of pork became a vital survival strategy for conversos and moriscos  to prove their "New Christian" status, demonstrating they had abandoned ancestral dietary laws to avoid persecution.

While the adoption of lard began as a social necessity, it eventually defined the pastry’s technical mastery. The fat’s unique properties allow the dough to be stretched into almost transparent sheets, resulting in the aerial flakiness and laminated layers that distinguish the modern ensaïmada. This culinary evolution was codified in 2003 with Protected Geographical Indication (PGI) status, cementing the link between Mallorca’s complex cultural history and its most famous sweet. 

The secret truly lies in the saïm; while modern bakeries often lean on butter, a traditional ensaïmada strictly requires pure pork lard and water to achieve that signature, shatteringly crisp exterior and feather-light interior. By stretching the dough until virtually transparent and smearing it with softened lard, the yeast builds intricate layers that a quick bake simply cannot replicate. My secret is using only half as much lard !

These authentic Mallorcan Ensaïmadas require 15-18 hours of patience, but that melt-in-your-mouth texture is worth every minute. If you are in a rush, you can double the yeast to halve the waiting time (7 ½ - 9 hours) or even quadruple it for a quicker result (3 ¼ -4 ½ hours), though the depth of flavor and the signature pull-apart spiral may be compromised. 

This recipe scales the classic large-format pastry down into 20 individual portions baked in ¾ cup aluminum tins. For a professional touch, I have included optional baker's additions: vital wheat gluten for maximum elasticity, non-diastatic malt powder for a richer crust, and a delicate flavoring of anis liqueur and seeds in the dough, finished with white vanilla powder mixed into the icing sugar. 

It is so surprisingly tasty and satisfying that you simply must give it a try ! … :)

mallorcan «ensaïmada» mini easter sweet breads

07.03.2026

20 x 47g each

ingredients

dough :

  • 500g (4 cups) strong bread flour (high protein is essential and if using the two optional powders below, reduce this to 480g to maintain the correct hydration)
  • optional : 10g (1 ¼ tsp) vital wheat gluten (ensures the dough can stretch paper-thin without tearing)
  • optional : 10g (1 ¼ tsp) non-diastatic malt extract powder (for deeper crust color and a subtle, sweet flavor)
  • 180ml (¾ cup) lukewarm water (around 38°C/100°F)
  • 5g (1 ¼ tsp) fresh yeast (double or triple or quadruple, if in a rush, see note below)
  • 100g (almost ½ cup) eggs (weight without the shells), room temperature
  • 100g (½ cup) granulated sugar
  • 5g (1 tsp) fine sea salt
  • 15ml (1 tbsp) anise liqueur (spanish anisette or french pastis or greek ouzo or italian sambuca) 
  • 2g (1 tsp) anise seeds 
  • 10ml (2 tsp) light olive oil (for greasing the bowl and dough ball)

lamination : 

  • 125g (½ cup) pure pork lard, room temperature (very soft)

Icing/finishing :

  • 50g (½ cup) icing sugar (for a heavy dusting after baking)
  • 2g (¾ tsp) vanilla powder (mixed with the icing sugar)

baking : 

  • 20 aluminum baking tins (¾ cup or 175ml volume each)
  • extra lard or butter for thoroughly greasing the 20 aluminum tins

instructions

  • *note : ideally, you want to begin making these at 3pm, to bake them the next morning at 9am (it’s a 15 to 18-hour process in all, for a very slow-rise dough, depending on the room temperature) …
  • whisk together your 500g total dry base (the flour, plus the optional gluten and malt powder, if using) to ensure they are evenly distributed
  • crumble the 5g of fresh yeast directly into the bowl of your stand mixer, pour in the 180ml of lukewarm water and ½ tsp of the granulated sugar and 1 tbsp of the flour mixture and whisk gently until the yeast is completely dissolved and let it sit for 10-15 minutes until frothy
  • *note : if you are in a rush, you can increase the fresh yeast to 10g for a 7 ½ second rise or 20g for a 3 ¼ hour second rise, instead of the 5g of fresh yeast and the 15-hour second rise …
  • add the dry mixture, the eggs, the remaining sugar, and the aromatics (you can use orange blossom water and/or citrus zests instead) to the yeast mixture and knead on low speed until a rough dough forms and let rest fro 5 minutes, then add the salt and increase the speed to medium and knead intensively for 10 to 15 minutes until the dough becomes perfectly smooth, highly elastic, and pull cleanly away from the sides of the bowl
  • shape the dough into a smooth ball, rub with some of the oil and place it in a bowl lightly greased with the rest of the olive oil, cover it with a damp kitchen towel, and let it rise in a warm spot for 1 ½ to 2 hours (in a turned-off oven is perfect) until doubled in size
  • punch down the dough to deflate it and divide the dough into 20 equal pieces (they will weigh exactly 44g to 45g each)
  • roll each piece into a tight ball, place them on the counter, cover with a towel, and let them rest for 20 minutes to relax the gluten (and chilling the balls in the refrigerator will make the dough easier to work with later)
  • roll one dough ball out with a rolling pin into a very long thin rectangle/oval
  • take about 6g (1 tsp) the soft room-temperature lard and smear the lard delicately across the delicate dough or dab small amounts of lard all over the surface and use the flat pads of your fingers to gently pat and glide the lard until the dough has an even, glossy coating
  • roll the dough into a long string and twist it gently until it looks like a thin, long rope and stretch the rope slightly longer, then coil it into a loose spiral and tuck the final end underneath the coil
  • *note : my thin dough rope method allows you to decrease the amount of lard used from the usual 250g down to 125g …
  • place each spiral into a well-greased ¾ cup aluminum tin and place inside a baking dish and continue with the rest, one by one, until all twenty are done
  • place the tins inside a baking dish (and ideally with a cover too) in a draft-free place (a turned-off oven is perfect) and let them rise slowly at room temperature for 12 to 15 hours (the spirals will swell dramatically, filling the tins with a puffy, delicate structure)
  • preheat your oven to 180°C (375°F)
  • bake the tins inside the baking dish with a lid, on the middle or lower rack for 12 to 15 minutes total (6-7 minutes with a lid and the 6-7 minutes without a lid) and with a baking sheet filled with water on the floor of the oven to create steam from the start
  • watch them closely until they develop a rich, golden-brown crust and
  • remove them from the oven and let them cool partly in their tins and then check if the underside is cooked correctly and if not, remove them from the tins, place them back inside the the baking pan, with baking paper this time and let them bake for another 2-3 minutes
  • once entirely cool, use a fine-mesh sieve to coat them heavily with the icing sugar and vanilla powder mixture
  • *note : they are better on the first day but because there are so many, there are several ways to correctly store the leftovers : you can place half of the non-icing sugar sprinkled buns in an airtight container (I froze half of them for later) and for those left at room temperature, place them in an air-tight container and when ready to eat them the next day, lightly spray them with water and reheat them in a 165°C oven, in a baking dish with a lid, for 5-7 minutes, then remove them, let them cool down and sprinkle with the icing sugar and vanilla powder, they will be just like fresh buns …