«vol-au-vent» puff-pastry cases«vol-au-vent» puff-pastry cases«vol-au-vent» puff-pastry cases«vol-au-vent» puff-pastry cases«vol-au-vent» puff-pastry cases«vol-au-vent» puff-pastry cases«vol-au-vent» puff-pastry cases«vol-au-vent» puff-pastry cases«vol-au-vent» puff-pastry cases«vol-au-vent» puff-pastry cases

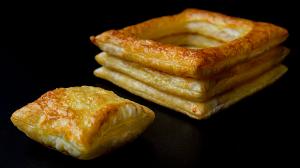
Just like PILLOWS and INFLATED MATTRESSES ! What interesting puff-pastry architectures indeed ! Originally, the “vol-au-vent” culinary term signified “windblown”, to describe the hollow, light and airy puff-pastry cases or patty cases, prepared and pre-baked, to be later filled with sweet and/or savory fillings, most often combined with a thickened cream or sauce.

Most people today just buy them, usually round or cylindrical in shape, either medium-sized at about 9-10 cm in diameter for starters or smaller bite-sized sizes about 4-5 cm each as appetizers, but they were originally prepared in much larger dimensions, measuring between 15-20 cm in diameter and shared by slicing.

Store-bought versions are fuss-free and are relatively inexpensive, but they are smaller, lighter and drier, almost like crispy and airy biscuits but somewhat too crumbly and rather neutral in taste and each can accommodate approximately ½ cup of filling maximum.

These versions which I am showing you, are larger because they’re square, measuring 10 cm x 10 cm and also higher at 5 cm high and thus hold around 33% more filling,  

And because they are fresher and less dry and less crumbly, they are inevitably tastier.

It’s like making a pie. If the crust is tasty, then the whole pie is tastier too. Am I right ?

Give it a try and make a few puff-pastry cases for your end of the year preparations and lighten up these coming holidays with something home-made, hand-made and wholesome … :)

«vol-au-vent» puff-pastry cases

19.12.2020

4 cases with caps x 60 grams each

ingredients

  • 450 grams puff-pastry, 2 store-bought sheets or home-made (see my recipe here)
  • 55 grams (1 whole medium) egg, beaten
  • optional : 60 grams (4 whole medium-sized) cooked shrimps as garnish for pastry-shell caps if making seafood vol-au-vent pastry cases)

instructions

  • use chilled home-made puff pastry dough (see my recipe here), rolled out and flattened to 3-4 mm thickness or 2 sheets of all butter store-bought puff-pastry dough (that will usually weigh 230 grams each and measure 35 cm x 25 cm if rectangular or 30 x 30 cm if round each)
  • lay out the puff pastry on 2 sheets of baking paper and cut out 6 squares measuring 10 cm x 10 cm each, on each sheet of puff pastry, using a square pastry cutter or sharp knife, chill again in the freezer if they get too warm and soft
  • using a smaller square 8 cm pastry cutter, create an indentation on 2 of the squares (not going all the way down) and prick the smaller square 8 cm x 8 cm surface with a fork (these will be the bases for 2 cases) 
  • cut out and remove 4 squares measuring 8 cm x 8 cm too (these will be the caps) from the remaining 4 large squares (these will be the sides of each case)  and carefully set aside, remove the excess around the squares, repeat with the 2nd sheet of puff pastry
  • freeze the dough cut-outs for 15 minutes (or much longer) and preheat the oven to 210°C for at least 15 minutes
  • bake the puff pastry squares for 8-10 minutes until puffed up but not golden nor fully baked yet, press down on the center of the indented squares that will be the bases if they puffed up too much
  • using the beaten egg, gently brush the tops of all pieces and the undersides of the 4 hollowed squares and gently assemble, using the beaten egg as glue in the between the pieces and brush the insides of the assembly with beaten egg too and the caps
  • bake again for 2-3 minutes at 210°C until golden and well-baked, then remove from the oven and let cool down completely before using or store in tins (up to several days) until needed
  • *note : before baking, you can decide to inlay some decorative garnish into the caps, as I did for other recipes with seafood, by simply laying a cooked and partly peeled shrimp on each cap, before baking, using beaten egg just on the underside of the shrimp as the glue and then baking as indicated for 8-10 minutes and baking again for 2-3 minutes with beaten egg wash brushed on the tops of the caps and the shrimps as well, until golden …