14-day wholewheat & rye & buckwheat sourdough-starter (longer but foolproof)14-day wholewheat & rye & buckwheat sourdough-starter (longer but foolproof)14-day wholewheat & rye & buckwheat sourdough-starter (longer but foolproof)14-day wholewheat & rye & buckwheat sourdough-starter (longer but foolproof)14-day wholewheat & rye & buckwheat sourdough-starter (longer but foolproof)14-day wholewheat & rye & buckwheat sourdough-starter (longer but foolproof)14-day wholewheat & rye & buckwheat sourdough-starter (longer but foolproof)14-day wholewheat & rye & buckwheat sourdough-starter (longer but foolproof)14-day wholewheat & rye & buckwheat sourdough-starter (longer but foolproof)14-day wholewheat & rye & buckwheat sourdough-starter (longer but foolproof)

This SOURDOUGH series is in 3 parts : the 1st is for making the sourdough starter, the 2nd is for making the actual sourdough bread with the sourdough starter and the 3rd is for how to use the daily leftovers that you accumulate and usually discard but that you should save, while preparing the sourdough starter, to make some savory cakes twice (or once per week during the 2-week process) … THESE 3 RECIPES ARE FOR ALL OF YOU WHO WROTE TO ME AND/OR ASKED ME DIRECTLY, especially for my dear ex-neighbors Olena & Ivan (from Kiev and then from Paris and who now live in London) and for my very old friends Manu & Nadia (from Lyon and Montreal respectively and then from Pezenas, in the southwest of France, and who now live in Montreal) … well, here they are !

It’s not easy making your own home-made sourdough starter. Trust me, I know. It may seem like a crazy idea, creating your own flour and water mixture that will become rich in wild yeast and flavors, as each day goes by, while refreshing it, by discarding half and feeding it with as much as was subtracted. It’s much more complicated than just using cubes of compressed cake yeast or dried powdered forms of yeast to make a bread rise. This is a personal choice and I often use regular yeast because it’s easy and because my body and stomach have no issue with it. But sometimes, you and I want something different, so I’m giving you something different. And YES, my way takes longer (but only at the beginning for the prep work) but it is foolproof in its effectiveness and simplified in its approach.

It can be messy. You can get mixed up and confused with all the numbers, weights and volumes. You can forget the weight of stuff, like the jars you’ll use or the amount that must be discarded to refresh it and feed it to revive it. You may feel guilty about throwing stuff away every day (but I have a solution for that too in part 3 of this series). You may get discouraged because it may not be a 7-day process like you thought it could be (unless you double-discard and double-feed it every day). Perhaps your mixture is not active nor rich enough, because we live in more polluted and toxic environments and natural things may take longer to create.

Do not despair. My method takes longer but works. An older & aged sourdough will have more yeast and flavors than a younger one, which is why some people have sourdough starters that have been passed down, multiplied and developed for over half a century. It will get better with time, but a younger 2-week sourdough is great too, at least for that first loaf of bread that you will make with it.

If you do it as I do, preparing everything beforehand for the next 14 days, then most of the prep work is done on DAY 0. After 14 days, you’ll have a perfect sourdough starter to make your first sourdough bread and then you’ll conserve some of that extra sourdough starter that you haven’t used for the next time, refreshing it and feeding it weekly because it can sleep in the refrigerator but it is still alive and needs to eat once in a while to be healthy and revived ! This way, you’ll preserve it, refresh it, feed it, multiply it, use part of it and perhaps conserve it forever !

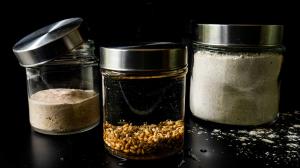
My mixture is a naturally strong one. I use organic flours like wholewheat and rye and some buckwheat (which isn’t really a wheat and has no gluten). Even the water that I use is spring water that I infused with wheat berries (or whole grains of wheat) that have soaked in it, making it richer and more nutritious.

I take my time and give it the time it needs and feed it and refresh it gently and daily for 12 days and then on day 13, I feed it twice, once in the morning and once in the evening it on the day before using it. And finally, on day 14, on the morning that it is needed, I conserve part of it in the refrigerator and double-feed and prepare the sourdough-starter that will become part of the bread to be baked.

If you understand numbers, these are the equations for the next 14 days : on day 1 you begin with 50 grams of flour mixture + 50 grams of water = 100 grams of the total mixture, on day 2, you double it and then from day 3 until day 12, you discard half (or conserve separately) and keep feeding it everyday with the same mixture or 100% of its initial weight and on day 13 you feed it twice (at a 12-hour interval) and on day 14, you conserve some and you double-feed what you’ll be using with twice or 200% of its weight until it’s ready and actually triples in volume …

Here’s your SOURDOUGH STARTER CALENDAR (that you can print up & cut-out) :

F=flour mixture (50 grams = 6 tbsp + 1 tsp)

W=water mixture (50 grams = 3 tbsp + 1 tsp)

M=flour & water mixture (50 grams = 3 tbsp / 100 grams = 6 tbsp)

DM=discarded flour & water mixture (100 grams = 6 tbsp)

day 1           50g F  + 50g W = 100g M

day 2           100g M + 50g F + 50g W = 200g M

day 3           200g M – 100g DM = 100g M + 50g F + 50g W = 200g M

day 4           200g M – 100g DM = 100g M + 50g F + 50g W = 200g M

day 5           200g M – 100g DM = 100g M + 50g F + 50g W = 200g M

day 6           200g M – 100g DM = 100g M + 50g F + 50g W = 200g M

day 7           200g M – 100g DM = 100g M + 50g F + 50g W = 200g M

day 8           200g M – 100g DM = 100g M + 50g F + 50g W = 200g M

day 9           200g M – 100g DM = 100g M + 50g F + 50g W = 200g M

day 10         200g M – 100g DM = 100g M + 50g F + 50g W = 200g M

day 11          200g M – 100g DM = 100g M + 50g F + 50g W = 200g M 

day 12         200g M – 100g DM = 100g M + 50g F + 50g W = 200g M

day 13 AM  200g M – 100g DM = 100g M + 50g F + 50g W = 200g M

day 13 PM  200g M – 100g DM = 100g M + 50g F + 50g W = 200g M            

day 14        200g M – 150g M** = 50g M + 50g F + 50g W = 150g STARTER* 

*ready to use when tripled in volume in 3-6 hours

**the 150g prepared mixture that is removed (I conserve less like 100g-125g) is the remaining amount to be conserved in the refrigerator for next week and that you should refresh weekly and/or refresh and re-feed the night before and the next morning, before using.

Give it a try ! … :)

p.s.: but if you prefer a faster solution without a real sourdough starter but with almost the same taste, see my alternative 24-HOUR SOURDOUGH BREAD (WITHOUT A STARTER) recipe here.

14-day wholewheat & rye & buckwheat sourdough-starter (longer but foolproof)

10.05.2019

150 grams

ingredients

flour mixture (total of 750 grams / almost 6 cups) :

dark version :

  • 375 grams (3 cups) wholewheat flour                         
  • 250 grams (2 cups) rye flour                                    
  • 125 grams (¾ cup + 1 tbsp) buckwheat flour                           

light version (half-white) :

  • 375 grams (2 ¾ cups + 2 tbsp) white all-purpose flour 
  • 187,5 grams (1 ½ cups) wholewheat flour
  • 125 grams (1 cup) rye flour
  • 62,5 grams (¼ cup + 2 ½ tbsp) buckwheat flour

water (total of 750 grams / 3 cups + 2 tbsp) :

  • 750 grams (3 cups + 2 tbsp) natural, light spring water 
  • optional : add 75 grams (6 ½ tbsp) dried whole wheat berries (or grains) to the water + an extra 75 grams (5 tbsp) spring water (to compensate for the water absorption by the wheat berries) and let soak for at least 24 hours before straining (or longer up to 72 hours)

instructions

  • mix together 750 grams or almost 6 cups of your preferred flour mixture for the sourdough starter (whether the darker & intense version or the lighter & whiter version or something in between) and place in large jar or separate into 15 equal parts of 50 grams each (slightly over 6 tbsp) and conserve them in separate cups or jars (this makes the daily feedings easier in the mornings before going to work)
  • do the same thing with the water (after removing the grains of wheat or wheat berries if you use them) but store in a cool place in a large jar or 15 separate jars of 50 grams each (3 tbsp + 1 tsp) with a lid
  • day 1 : in a medium-sized jar (weigh the empty jar(s) before and write it all down), combine 50 grams of the flour mixture with 50 grams of the water (strain to remove the wheat berries) and cover loosely with a cheesecloth or a partly with a lid (to let the air circulate) and keep at room temperature between 21°C and 25°C (on top of your refrigerator is often ideal at 23°C) and wait 24 hours (the total weight is 100 grams)
  • day 2 : add an additional 50 grams of flour mixture and an additional 50 grams of the water, stir well and cover loosely again at room temperature and wait another 24 hours (the total weight is 200 grams)
  • day 3 until day 12 (for the next 10 days) : every day, remove half of the total or 100 grams of the mixture and discard (or see the note below and save it as I do), add 50 grams of the flour mixture and 50 grams of the water (thus 100% of the initial reserved volume) and stir well, then cover loosely and let sit on top of the refrigerator until the next day (the total weight is 200 grams) and repeat daily, discarding half or 100 grams of the 200 grams total and adding 50 grams of the flour mixture and the 50 grams of water each day (the total will be 200 grams every day)
  • note : to avoid waste, conserve the daily remaining 100 grams of the half flour and half water mixture from day 3 until day 13, which will total 600 grams on day 8 and another 600 grams on day 13 and transfer daily to a large jar and refrigerate with a tight lid, it can be used for something else and I’ll show you what you can do with it soon enough …
  • note : the sourdough starter will take some time to enrich itself with wild yeast in the air and become very active but will be relatively inactive for the first 7 days but will increase everyday and by day 10 will often double in volume when fed once per day and will more than double or almost triple in volume by day 13 and on day 14, it will triple in volume a few hours after you feed it …
  • day 13 - part 1 & part 2 (feeding in the morning and in the night of the day before using the starter to make a loaf of bread) : proceed as usual, discarding half or 100 grams and feeding once in the morning with 50 grams of the flour mixture and 50 grams water and repeat once again at night (12 hours later) discarding half or 100 grams and adding 50 grams flour mixture and 50 grams water again, stirring well and loosely covering and letting rest overnight on top of the refrigerator (the total weight is 200 grams)
  • day 14 : recuperate only 50 grams (3 tbsp) of the starter that was fed twice the day before (save the rest that will be between 100 and 150 grams in another separate medium jar and refrigerate (see the section below)
  • add 50 grams of the flour mix + 50 grams water (thus 200% of the initial volume) to the 50 grams (3 tbsp) of recuperated starter and let rest at room-temperature or preferably on top of the refrigerator for 3-6 hours until tripled in size (the total weight is 150 grams)
  • when your well-fed sourdough starter seems ready and has tripled in volume, test the sourdough starter readiness and activity by carefully recuperating 1 tsp of the starter and gently dropping in a glass of room-temperature water, if it floats towards the top, then it is ready; if it rapidly sinks down half-way or to the bottom, then it is probably not active enough so discard two-thirds or 100 grams of the total sourdough starter, keep 50 grams and feed again with 50 grams flour mix and 50 grams water, stir well, partly cover and wait an additional 3-6 hours until tripled in size and test again
  • now you will be ready to use 125 grams (7 ½ tbsp) of the super active sourdough starter in my next bread recipe that will be as easy as 1-2-3 !
  • storing leftover sourdough starter on day 14 :
  • do not discard the rest of the active sourdough starter but store the remaining fed starter (try to keep between 100 and 150 grams) in a jar, covered with a lid that is screwed on lightly (not air-tight), and refrigerate until next time (or up to 1 week maximum) but remember to feed at least once weekly …
  • using the refrigerated sourdough starter after each week :
  • to use the refrigerated sourdough starter one week later, recuperate 100 grams of the refrigerated starter, let it reach room temperature and feed again as usual, by adding 50 grams flour mixture and 50 grams water, loosely cover and  wait until more than doubled in volume which can take longer, between 6 and 12 hours this time to wake it up and revive it
  • recuperate 50 grams (3 tbsp) of this fed starter and feed it again with 50 grams flour mixture and 50 grams water and wait until it triples in volume after 3-6 hours and do a floating test in water
  • store the remaining 100-150 grams of the fed sourdough starter in a jar until the next time you use it again and feed again weekly …