- firstly, decide when you would like to bake your bread, in 12, 18 or 24 hours and then measure out the amount of yeast accordingly (amazingly enough, the beer and fermented milk do not sour even after 36 hours but I prefer the 24-hour process)
- measure out all your ingredients, place the salt at the bottom of your mixing bowl and cover with the 500 grams of flour
- in a smaller bowl, gently whisk together the room temperature beer, the sugar, the room temperature fermented milk (or buttermilk or kefir) and the 100 grams of flour, add the dry active/instant yeast, stir and let sit several minutes (it won’t become frothy because it will not be warm enough)
- add the yeast mixture to the flour and salt mixture in the mixing bowl, do not stir, let rest for 1 minute and then knead with the dough hook for 5-7 minutes at low/medium speed
- oil a large boil, place dough inside, cover with plastic film and let rise until double in size at average room temperature (19-21°C) for 10-12 hours (with 1 tsp yeast) or 20-22 hours (with 1/2 tsp yeast)
note 1 : the rise of the dough is affected by many factors : temperature, humidity and the yeast amount … 1 tsp of yeast will make a dough rise twice as fast as ½ tsp; temperature differences affect the rise : in the refrigerator at 5°C, the rise will be extremely slow and may take days; at 10-15°C, the rise will be very slow; at 15-20°C, the rise will be slow; at 20°-25°C, the rise will be average, at 25-30°C, the rise will be rapid; the slower the rise, the more flavorful the bread will be …
note 2 : depending on how much yeast you decide to use and the temperatures (whether warm or cold), the rising time will always vary … either way, the dough is ready when it has doubled in size for all variations, and this could be almost 12 hours or 24 hours or even longer if you prefer a very slow rise; the second rise (almost doubling again) is at room temperature (20-23°C) for 1½-2 hours
- if you’re bowl is large enough and very rounded, sprinkle flour on the inside and fold the dough over with a large rubber spatula, directly inside the bowl, sprinkle the sides of the bowl with more flour and keep folding over several times (if not, transfer to a well-floured surface and fold over several times, on a flat surface)
- after the folding, heavily flour a large piece of parchment paper, let dough fall out of the bowl onto the parchment paper (or simply transfer it if you did not flour and fold it in the bowl), shape into a nice round ball and sprinkle with flour, cover with a larger bowl (turned upside down) and let rise again for 1 ½-2 hours in a warmer space (20°C)
- preheat your oven to 230°C (this is my oven’s maximum temperature) with a cast-iron dutch oven (and its cover) inside the oven and heat up for 30-35 minutes
- carefully remove the very hot cast-iron dutch oven, lift up the parchment paper with the dough (this may require 4 hands) and lower/place everything inside the very hot dutch oven, make 1 large cross-cut with a very sharp knife or blade, cover with the lid and bake for 30-35 minutes, then remove cover, sprinkle/spray the bread and oven with water (to create steam) and let bake another 10-15 minutes until the crust is golden and crispier
note 3 : cooking the bread in a cast-iron dutch oven creates an extremely hot and steamy environment, spraying extra water inside the oven and on the bread, after you remove the cover, creates an even crispier and crustier bread
- after the total 45 minutes baking time, tap the bread on the underside to see if it is ready, when you tap it on the underside, it should make a hollow sound; if you would like to bake it more to make it crustier, remove the baked bread from the dutch oven, remove the parchment paper and spray the oven and all sides of the baked bread with water and bake for another 2-3 minutes
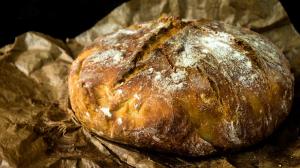
- remove from oven and let cool on a rack for 30 minutes before slicing.
*NEW NOTE 4 (just added September 25, 2016) : for the bread to expand alot and to be quite high and crustier, you need to keep the crust from forming too quickly so the bread can continue to expand while still baking inside the cast-iron dutch oven; carefully remove the hot pot from the oven after the first 15 minutes of baking and spray the top with water, recover with the lid, bake another 15 minutes, then remove and spray and recover again ... at the end, as mentioned above, remove the lid completely after the initial 30-35 minutes baking time, bake for another 5-10 minutes (without the cover) until golden, then at the end, completely remove the bread from the cast iron pot, remove the parchment paper too, spray all sides with water, spray the oven with water too and bake for another 5 minutes until darker and crustier ... :)
Comments ? Questions ? Send me an email using the contact section below !