chocolate-coated cookie & peanut butter cup candy biteschocolate-coated cookie & peanut butter cup candy biteschocolate-coated cookie & peanut butter cup candy biteschocolate-coated cookie & peanut butter cup candy biteschocolate-coated cookie & peanut butter cup candy biteschocolate-coated cookie & peanut butter cup candy biteschocolate-coated cookie & peanut butter cup candy biteschocolate-coated cookie & peanut butter cup candy biteschocolate-coated cookie & peanut butter cup candy biteschocolate-coated cookie & peanut butter cup candy bites

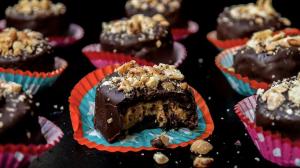
Need a new idea for HALLOWEEN ? Who doesn’t ? Here’s a home-made chilled treat for everyone, young and/or old or just not so young. This year it’s gonna be a  combination mini “reese’s peanut butter cup” and “ice-cream sandwich” all-in-one number because I’m all “pumpkined-out” from all the stuff recently and in the past years !

You know that I’ve already done many pumpkin treats in the past, actually a full series that you could see in the desserts section of the blog, like pumpkin fruit jellies (see recipe here), pumpkin caramels (see recipe here) and finally the chocolate pumpkin jelly and caramel cups (see recipe here) and I almost forgot the pumpkin jam & butter & seeds with all the pumpkin remains (see recipe here) and last week’s sweet & spicy rustic pie (see recipe here) … so it’s going to be peanuts & chocolate in this 2nd half of October 2018. 

It makes me sad and nostalgic that Halloween isn’t a “big deal” here in Paris. I do understand of course. We live in a big, busy overcrowded city with mostly apartments in large buildings so I don’t know how wise it would be to bring kids to (or let unattended kids go to) buildings with door codes, gate codes, elevator codes (if there’s an elevator) and floor after floor of staircases just for a few sweet treats ?!

The recipe I’m giving you here is a small volume version of 15 bites adapted to my silicone molds. It’s more of an “assembly” than a recipe. 

I live in an almost plastic free home. Most of my containers and equipment are metallic, wooden or made of glass but I’m sure that these preparations would be nearly impossible to easily make without those silicone molds. The molds are oven-safe, freezer safe and sturdy enough to bake in and malleable enough to shape and unmold the baked and then frozen treats before double-dipping them in chocolate. I guess a rolling pin, metal pastry rings and elbow grease would also get the job done but who has 15 or more rings lying around the house anyways, for cutting out the cookies and then assembling and freezing them ?

This is how I made them and perhaps it’s how you’ll try to make them too.

That’s my short pre-Halloween story. I promise that things will get “scarier” next week . . . ;)

chocolate-coated cookie & peanut butter cup candy bites

20.10.2018

15 bites weighing 38-40 grams each

ingredients

cookies (175 grams for 30 cookies or 2 cookies per candy bite) :

  • 50 grams (3 ½ tbsp) soft butter
  • 40 grams (3 ½ tbsp) golden cane sugar
  • 5 grams (1 ½ tsp) peanut butter
  • 62,5 grams (½ cup) all-purpose flour
  • 15 grams (2 tbsp) cocoa powder
  • 2,5 ml (½ tsp) vanilla extract
  • 0,5 gram (1/8 tsp) salt

cream filling (275 grams for 15 candy bites) :

  • 150 grams (¾ cup + 1 tbsp) smooth, sweetened peanut butter 
  • 75 grams (¼ cup + 1 tbsp) cream cheese 
  • 15-22 grams (2-3 tbsp) icing sugar
  • 5 ml (1 tsp) vanilla extract
  • 0,5 gram (1/8 tsp or 1 pinch) salt
  • optional : 25 grams (3 tbsp) chopped roasted peanuts (add after mixing)

chocolate coating (for 15 candy bites) :

  • 200 grams (1 cup) dark and/or milk chocolate
  • 15 grams (1 tbsp) coconut oil

decorative garnish (for 15 candy bites) :

  • 17 grams (2 tbsp) chopped and roasted peanuts
  • 10 grams (2 tsp) rock sugar
  • optional : 1 pinch of salt flakes

instructions

  • note : you will absolutely need silicone molds for this preparation in order to bake the cookies, to add the filling that will be sandwiched between the pre-baked and cooled cookies and to freeze the assembled pieces and then unmold them before dipping them in the warm chocolate coating; I used 2 molds for the cookies and 1 mold to assemble, freeze and unmold them; each mold measures 30 cm x 17,5 cm in total with 15 round or cylindrical cavities each measuring 4 cm in diameter x 2,5 cm deep each ...

filling :

  • prepare the filling by combining all the ingredients until smooth, then chill in the refrigerator for 1 hour or more

cookies :

  • cream the soft butter and sugar together and then add the vanilla extract and peanut butter (or simply work the sugar into the soft butter with your fingers for such a small quantity), then combine with the flour, cocoa powder and salt, form and press into a compact ball, wrap up in plastic film and chill in the refrigerator for at least 30 minutes 
  • separate the chilled dough into 30 equal pieces of 5-6 grams each (about 1 tsp each), press into the silicone molds and flatten, then chill again for 15 minutes
  • note: you can also roll out the dough to 3 mm thickness, cut out the circles, and then roll up into a ball and then roll out the dough again, until you have enough but that’s complicated …
  • preheat oven to 180°C
  • bake the flat cookie disks for 10-12 minutes, then remove from the oven and let cool completely before removing from the molds

assembly :

  • place back half (or 15 out of 30) of the cookies in the mold, fill each cavity with the filling (about 1 – 1 ½ tbsp each), then cover with the 2ndcookie and press down until level and even, then place the whole mold in the freezer for at least 2 hours until the sandwiched assemblies are all frozen solid, then unmold just before dipping in the chocolate-coating
  • melt the chocolate in a double-boiler (bain-marie) with the coconut oil, then transfer to a recipient that will be deep enough for dipping twice
  • note : each bite will be covered in 10-12 grams of chocolate so you’ll be left with almost 3 tbsp or 45 grams of the melted chocolate but it’s easier to dip cookies in a larger volume; save the rest in a jar for dipping pieces of fruit.
  • dip the frozen peanut butter candy bites into the warm melted chocolate once or twice and set aside on a rack with baking paper and immediately sprinkle the tops with the crushed peanuts and the rock sugar
  • set aside until completely hardened and reserve in the refrigerator in an air-tight container
  • serve chilled from the refrigerator or reserve in the freezer and let them slightly thaw for 15-30 minutes in the refrigerator before serving.