upside down apple tart - the elongated versionupside down apple tart - the elongated versionupside down apple tart - the elongated versionupside down apple tart - the elongated versionupside down apple tart - the elongated versionupside down apple tart - the elongated versionupside down apple tart - the elongated versionupside down apple tart - the elongated versionupside down apple tart - the elongated versionupside down apple tart - the elongated versionupside down apple tart - the elongated versionupside down apple tart - the elongated versionupside down apple tart - the elongated versionupside down apple tart - the elongated version

Stephanie & Caroline  – better known as the "TATIN SISTERS" never had a mold like this to make elongated, easier-to-make and easier-to-serve upside down apple pie or  “taaaaarte tatiiiiiiin”  !

This interesting dessert which is now a classic, was invented accidentally around the end of the 19th century (a case of “serendipity” indeed) by the sisters who were, one weekend and as usual, preparing an apple tart/pie in their restaurant for their clients (often Sunday hunters) and realized that they had already placed the apples inside the pie mold but had forgotten the crust underneath, so it was placed and top, baked and then turned over … the rest is history. Of course this is nothing new to any of you, but my process is slightly different because the apples are poached before (try to keep this reusable poaching liquid in the refrigerator for my next recipe) and the sizing is different too.

The idea came to me when I happened to notice that I had small apples that fit inside this silicone mold (usually used to make cooked sausage or meats wrapped up in pastry dough and then sliced and served in little squares, as appetizers). I find that the only difficult aspect of this dessert (when making it in its original round shape) is laying the apples out in perfect circles and spirals and worrying if you have enough slices to fit correctly or if the shape will hold. Making it in a longer and thinner version with a single-file row of apple slices version is so easy, for measuring out as well as for preparing. Of course you need a thin and long mold or even better, a tripe-mold like I do (yeah, luck me). My triple-mold measures 33 x 24 cm and has three openings measuring 30 cm long x 6 cm wide and 4 cm high) but the recipe ingredients and measurements also apply to a regular, boring, round apple tart of approximately 25 x 25 cm too (just joking) … Just trying to make baking life just a little bit easier, my friends … :)

upside down apple tart - the elongated version

26.01.2016

9-12

ingredients

apples preparation

  • 1 kg small peeled and cored apples (1,5 kg before peeling and coring)
  • 333 ml water ( 1/3 cups + 1 tbsp)
  • 333 grams granulated sugar (almost 1 2/3  cups + 1 tbsp )
  • 333 grams butter (almost 1 1/3 cups + 1 1/2 tbsp)
  • 1 vanilla pod
  • 2-3 tbsp lemon juice (1 lemon)

caramel

  • 150 grams granulated sugar (3/4 cup)

crust-dough

glaze

instructions

  • peel and core apples and slice in 4 (try to cut them slightly larger than the width of mold if using rectangular molds like I did) and toss them with lemon juice immediately, as you peel and cut them (to avoid rapid browning)
  • combine water, sugar, butter and vanilla pod (slit in half) in a large pot and bring to a boil, add apple quarters and lower heat and simmer at medium heat for 10 minutes until slightly translucid, then drain and set aside (you can do all the apples at once as I did or in two times)

note : you can conserve this apple-flavored butter, water, sugar, vanilla syrup in the refrigerator for several days or in the freezer to reuse (I have new desserts coming up with this !)

  • prepare caramel by heating the 150 grams granulated sugar in a small casserole, add 1/3 at a time (50 grams) until it starts melting and liquefying and add again and again, stir slightly so it doesn’t burn towards the end
  • immediately pour a layer of caramel in the bottom of each mold and let harden
  • place your apple quarters in the bottom of each mold, pack them tightly and press down slightly and let rest several hours until completely cool in the refrigerator (overnight is even better)
  • preheat the oven to 180°-190°C
  • cut your chilled puff pastry slightly larger than the mold (1 extra cm on each side) and lay on top and press down, seal the edges by pressing on the sides and poke some holes on the top to allow hot vapor to escape, place back inside the refrigerator for 30 minutes before baking

note : for my triple-mold, I cut 3 pieces of puff-pastry dough measuring 32 cm x 8 cm

  • bake for 35-45 minutes, then remove and let cool
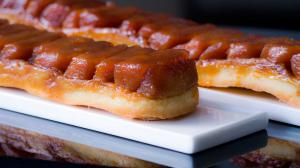
  • when cooled, flip onto a plate and brush the apples with some heated apple jelly (for additional shine).