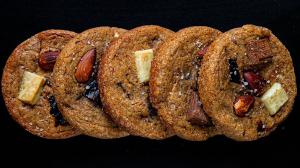
thick & chewy chocolate chunk & roasted almond cookiesthick & chewy chocolate chunk & roasted almond cookiesthick & chewy chocolate chunk & roasted almond cookiesthick & chewy chocolate chunk & roasted almond cookiesthick & chewy chocolate chunk & roasted almond cookiesthick & chewy chocolate chunk & roasted almond cookiesthick & chewy chocolate chunk & roasted almond cookiesthick & chewy chocolate chunk & roasted almond cookiesthick & chewy chocolate chunk & roasted almond cookiesthick & chewy chocolate chunk & roasted almond cookiesthick & chewy chocolate chunk & roasted almond cookiesthick & chewy chocolate chunk & roasted almond cookiesthick & chewy chocolate chunk & roasted almond cookiesthick & chewy chocolate chunk & roasted almond cookiesthick & chewy chocolate chunk & roasted almond cookiesthick & chewy chocolate chunk & roasted almond cookiesthick & chewy chocolate chunk & roasted almond cookiesthick & chewy chocolate chunk & roasted almond cookiesthick & chewy chocolate chunk & roasted almond cookiesthick & chewy chocolate chunk & roasted almond cookies

Or the “1-2-5” COOKIE since all the main ingredients each weigh 125 grams and are easy to remember, even the little added extras measure 1¼ tsp each which is also 1,25 teaspoons right ? And the baking time is 12 ½ minutes too. 

I also tried baking them at 125°C and then let them sit in a turned off oven but that’s where the magic and coincidence stops since the result is too cakey but not over-baking them is the most important thing and probably the most difficult step because you’ll be tempted to say to yourself, okay just a minute or two more would be better but “oh how wrong that is !”.

Cookie characteristics : crispness, chewiness, softness, hardness, thinness and thickness. All of these textural and/or physical characteristics are partly dependent on the ingredients but even more so on the baking time as well as the temperature of the cookie dough before baking it and the baking shape, whether spherical or slightly flattened.

It’s a question of personal tastes and what you’re in the mood for because sometimes you want thinner and crispier cookies, sometimes you want thicker and chewier cookies, or perhaps something in between or a combination of both ? All of this is possible with the same recipe but modifying the pre-baking and baking techniques.

Using the same recipe and the same batch of 24 cookies, I baked 4 batches of 6 cookies each to test different results. The dough had rested for 24 hours in the refrigerator (which is important for the dough to mature and develop its final texture) before shaping the chilled dough into golf ball-sized spheres, then I slightly flattened them, topped each with more roasted almonds and chocolate chunks and then inserted them into silicone rubber molds (which isn’t necessary but easier for me than trying to slip a large baking tray into my small freezer) and I flattened them further and froze them for just a few hours and then popped them out like ice cubes and placed them in freezer bags.

Each of the batches were cooked at 175°C for exactly 12 ½ minutes but the results were different for each because of the dough temperature before baking them and the decision to limit their freedom to spread out or not by using the silicone rubber mold or metal rings (with no bottoms).

The results were as follows :

1-baking cookies that have thawed for 25 minutes at room temperature before baking yields a larger and flatter and crispier cookie about 10 cm in diameter and almost 1 cm thick in the middle and very thin at the edges;

2-baking slightly frozen cookies that have thawed for only 12 ½ minutes while the oven is preheating, yields slightly more compact, slightly domed cookies that are thicker and chewier in the middle and thinner and crispier at the edges and measure about 9 cm in diameter and 1,25 cm thick in the middle with moderately thin edges;

3-baking slightly frozen cookies that have thawed for only 12 ½ minutes while the oven is preheating, but with a metal 8 cm ring around each to control the spread, yields compact, quite even cookies that are equally thick and chewy everywhere and measure 8 cm in diameter and 1,50 cm thick throughout;

4-baking slightly frozen cookies that have thawed at room temperature for 25 minutes in small silicone molds with openings of 6 cm each in diameter (and the same mold that was used to freeze them) yields moist (but not cakey), very compact and very chewy cookies that are approximately 2 cm thick everywhere and quite decadent;

All are very satisfying and taste the same but it’s a question of preferences of textures and overall appearance.

Whatever you decide, I have a preference for option number 3 as my favorite and option number 4 as my second favorite. I like controlling the spread and ending up with an evenly thick and chewy cookie throughout its entirety.

To resume, almost frozen dough is optimal, just let it thaw a little bit so the outside doesn’t burn or overcook before the inside has baked and to end up with evenly sized cookies, just use metal rings that are about 33% larger than the pre-shaped dough balls or discs (about 1 cm more per side).

And by all means, I repeat : “do not overcook them” because even though they may still be soft to the touch and look un-baked after 12 ½ minutes, they will continue to cook as they leave the oven and until they cool down (trust me, it’s what I did with the first 2 batches several weeks ago, with around 2-4 minutes of over- baking, before re-testing these one here, and they were too hard and dry). Every extra minute makes a big difference.

The only thing I may do differently next time is to replace 125 grams of chocolate with 125 grams of dried fruits like raisins or cranberries or even candied cherries (if I’m feeling kind of “fancy”). 

Anyways, see you at the next batch ! . . . :)

thick & chewy chocolate chunk & roasted almond cookies

15.02.2020

24 x 50 grams each

ingredients

  • 125 grams (1 cup) cake & pastry flour
  • 125 grams (1 cup) whole-wheat flour
  • 125 grams (¾ cup + 1 tbsp) dark brown sugar
  • 125 grams (½ cup + 2 tbsp) white or golden cane sugar (reserve 2 tbsp or 25 grams for sprinkling around the shaped cookie edges)
  • 125 grams (½ cup) butter, at room temperature
  • 125 grams (½ cup) almond butter/purée (unsweetened & natural)
  • 125 grams (½ cup) eggs (2 large or extra large)
  • 5 grams (1 ¼ tsp) baking soda
  • 5 grams (1 ¼ tsp) baking powder
  • 5 grams (1 ¼ tsp) fine sea salt
  • 6 ml (1 ¼ tsp) vanilla extract
  • 125 grams (1 cup) roasted almonds, some whole, some coarsely chopped
  • 125 grams (1 cup) dark chocolate, coarsely chopped
  • 125 grams (1 cup) white and/or milk chocolate, coarsely chopped (or replace with dried fruits like raisins or cranberries)
  • 1,25 grams (¼ tsp) hickory-smoked salt or flaky sea salt

instructions

  • roast the almonds for 5 minutes in a 210°C pre-heated oven on a baking sheet, remove from the oven when ready and let cool, reserve 24 whole almonds for decorating the cookies and chop the remaining almonds in half to be incorporated in the cookie dough
  • chop the chocolate squares in 48 larger pieces, to decorate the 24 cookies and in smaller pieces to be incorporated in the cookie dough
  • combine the flours with the salt, baking powder and baking soda and set aside
  • whip the softened butter, almond butter/purée, brown sugar and white sugar together for 5 minutes until pale and creamy, then add the eggs and vanilla extract and mix until smooth
  • add the dry ingredients to the liquid ingredients and mix until smooth (do not over-mix and stop mixing until the flour is no longer visible)
  • stir in the smaller chopped roasted almonds and chopped chocolate pieces into the dough with a wooden spoon, cover the dough tightly with plastic film and refrigerate for at least 12 hours overnight or 24 hours until the next day
  • separate the chilled dough into 24 balls (approximately 3 tbsp each or 45 grams), place onto some baking paper, flatten slightly and top each with 1 roasted almond and 2 pieces of chocolate and push them in slightly, sprinkle with salt and freeze for several hours
  • *note : I find it is easier to use a silicon mold with 8 openings that measure 6 cm in diameter to flatten and shape and freeze 8 cookies at a time and then pop them out (like ice cubes in an ice cube tray) and then place inside freezer bags …
  • remove the frozen cookies from the freezer (I bake 6 at a time), roll or sprinkle the outside edges with the reserved 2 tbsp or 25 grams of sugar, place on a baking sheet covering with baking paper, make sure they are spaced apart and bake as is (if you prefer uneven cookies that are thicker in the middle and thinner at the edges) or by using metal rings (mine measure 8 cm in diameter) to control their spread and make them evenly thick everywhere (if you prefer thicker more even cookies) and let them slightly thaw at room temperature while the oven preheats
  • preheat the oven at 175°C for exactly 12 ½  minutes (as the frozen cookies partly come to room temperature)
  • place the baking sheet with the cookies on the lower rack (or the middle rack if you prefer darker tops) and bake undisturbed for exactly 12 ½  minutes (and not one second longer even if they look slightly un-baked, because they will continue cooking for several minutes after removal from the oven and solidify and harden)
  • remove the baking sheet from the oven, let the cookies cool on the baking sheet for 12 ½ minutes, then transfer to a cooling rack and let cool for at least 12 ½ minutes
  • eat right away when still slightly warm or store in an air-tight container for up to 2 weeks.