Did you make any BREAD during the “lockdown” or “partial confinement” period ? Did you have flour ? Did you have yeast ? Is everything almost back to “normal” where you are ? Are you all okay ? Is it ALL GOOD ?!
If YES, have you tried quick-rise, normal-rise and slow-rise dough schedules ? Have you tried cold-oven baking, hot oven baking and hot oven and hot baking pan methods ? Do you prefer making your bread on a baking sheet or in a deeper baking dish and with or without a lid ? Do you like large loaves, medium half loaves or smaller quarter loaves and buns ? I tried everything these past 8 weeks, over and over and over again !
The idea is so simple. You start off by making a BASIC PIZZA DOUGH and then decide to transform and modify this pizza dough by rehydrating it and folding it and rolling it until it turns into bread dough.
All you’ll need is one kitchen scale, one large bowl, one small bowl, one large plate, NO ELECTRIC MIXER NOR FOOD PROCESSOR, one wooden spoon, maybe a silicone pastry scraper or spatula, some baking paper, a brush or spray bottle, one roasting pan with a cover (or some aluminum foil to replace the cover).
I preferred waiting until the “lockdown” was partly over to show you this little trick or hack, but I hope this easy and adaptable method convinces you to try it out, because it’s as easy as making pizza dough.
*If you’re into details and like reading, I explain everything further down, otherwise, just skip to the recipe ingredients and instructions. I’ve also shown you over 38 pictures to explain all of this and to present you with different options.
We have to talk about the INGREDIENTS and the WATER OR DOUGH HYDRATION or how much water there will be in the dough compared to the flour and any other special ingredients you can use.
We also have to talk about RISING TIMES. Is a fast rise as good as a slow rise ? What if you let the dough rest in the refrigerator overnight for a very slow rise ?
We should also talk about BAKING EQUIPMENT. Is it better on a baking sheet, completely exposed to the oven’s heat and eventual dehydration or in a baking pan with a lid, to maintain steam around the dough as it bakes.
And how about OVEN TEMPERATURES ? Is a hot preheated oven the only way to bake or can you even try out the cold-oven baking method and slowly reach the correct baking temperature ? Should the baking dish or sheet be extremely hot or at room temperature ?
We’re going to explore all of these details, one by one.
The bread dough INGREDIENTS or what it’s best to use ?
Bread is the simplest recipe in the world. Flour, water, salt and yeast. All-purpose flour is okay but stronger bread flour, whether white or a mix with whole-wheat is better because it has more protein thus more gluten and will create a better quality and chewier bread. I recently discovered MALT powder made of germinated barley, that is then dried and ground into a powder. It develops flavor with a touch of sweetness and nuttiness as well as helping the development of the yeast and the rise of the dough. All you need is to replace 1 tsp of flour with 1 tsp of malt powder per 1 cup of flour that you need for your recipe for an excellent and tasty result. Saltiness is a personal choice. It slows down the over-development of the yeast and the rise of the dough and increases flavor. Sometimes some sugar is nice too but that’s optional. A little bit of fat is optional too but I use it to add just a touch of moistness as well as using it on my hands to knead the dough and avoid it sticking to my fingers. And of course water, but how much ?
The dough HYDRATION or how much water should you use ?
Pizza dough is easy to make because it’s a drier dough, thus less sticky and easily malleable and in the end, the aim is to flatten it out and cover it with toppings so it doesn’t need more water. It’s “hydration” is 66% which means that for 250 grams or 2 cups of flour, you’ll use only 160 grams of water.
Normal bread can be hydrated at a mere 70% or 175 grams of water for 250 grams of flour but usually at 80% or 200 grams of water for 250 grams of flour. A wetter dough will always be harder and longer to knead and extremely sticky, especially flatbread dough like focaccia or lagana that is so soft that you simply place it inside your baking dish with lots of oil so it can spread out and not stick.
This is how the idea popped into my head. How can you make a loaf of bread with pizza dough which is drier, more compact and malleable thus easier to knead and shape and transform and modify it into dough for a loaf or several loaves of bread ?
You proceed with normal pizza dough-making techniques up to the 1st rise but later you flatten it out, you spray it with water and fold it and spray it again and fold it again and you repeat this one last time. Then you roll it, re-flour it, shape it into a longer log and wait until it rises again. You’ve just increased the “hydration” from 66% to 76%.
The dough RISE or how long is it best to wait ?
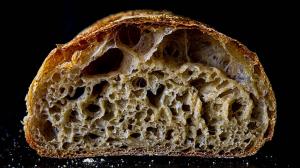
When bread rises, after being kneaded, it develops the strength of its structure as well as its flavor. A quick rise in a warm space will make the bread rise quickly but will produce a flatter and less deliciously complex result. A regular rise at room temperature will be an improvement but still not the best. A slow rise, either by using very little yeast or slowing it down in a refrigerator for 12 hours or up to 24 hours will produce the tastiest bread as well as the strongest dough structure, rising high, becoming chewy and developing interesting air pockets inside.
When is the dough READY to be re-kneaded and/or baked ?
Whatever anybody tells you, the best way to judge if your dough is ready, for the 1st rise as well as the 2nd rise and before baking it, is to do the FINGER POKE TEST. Use the tip of your finger, coated with flour, poke the dough, if it springs back quickly, give it more time, if it springs back very slowly or just a little bit, then it’s safe to re-knead it if it’s just after the 1st rise or preheat the oven, if it’s after the 2nd rise.
What BAKING EQUIPMENT to use or should the dough be directly exposed to the oven heat or not ?
Baking on baking sheet is always easy, but it will bake the bread too quickly on the outside and dry it out and perhaps bake it insufficiently on the inside. Baking the dough in a baking pan with a lid, like a cast iron dutch oven or an enameled roasting dish, will better control the heat and maintain a humid environment with steam, allowing the bread to bake and expand and rise higher.
What BAKING TEMPERATURES or is the hottest preheated oven the best option ?
I tried three methods. A preheated oven and room temperature baking pan, a preheated oven and oven-hot baking pan and the cold oven method, in other words, turning on the oven only when the bread was put inside to be baked. All three provide good results. The cold oven method allows the bread to gently rise some more before it starts baking but the end result will be just slightly less high with smaller air pockets and will obviously take more time. The hot oven method and using a hot preheated baking dish will produce the best visual results, with a high and puffy bread and crispy crust but it requires carefully transferring the dough inside a deep dish without deforming nor deflating it it. The normal preheated oven method is easiest, especially if you let the bread rise inside the baking dish with a lid and you simply place the whole thing, dough and baking dish and lid inside the preheated oven. The result is almost the same and much easier.
What BREAD SIZES or is a large loaf better than smaller loaves ?
I used the exact same recipe and quantities but varied the number of loaves it could be used for every week. One large loaf may seem easier than 2 medium loaves or 4 small loaves but it’s all the same. Making one large loaf doesn’t take less time than making smaller loaves, simply because smaller balls of dough are easier to flatten, fold and roll and shape. The only difference is that small baked loves can be refrigerated or put into air-tight bags until you need them, as opposed to a large loaf that can be wrapped up in a towel but will dry out more quickly if not eaten in 2 days.
It’s a lot of information to digest, at least for beginners and new-comers to the world of bread-making & baking, but I hope I’ve explained everything well enough.
There is no perfect method. It’s all about adapting the recipe to your schedule and tools and working with what you have.
GOOD LUCK & ENJOY YOUR BREAD EXPERIMENTS ! … :)