whole-wheat “toast” & sliced sandwich breadwhole-wheat “toast” & sliced sandwich breadwhole-wheat “toast” & sliced sandwich breadwhole-wheat “toast” & sliced sandwich breadwhole-wheat “toast” & sliced sandwich breadwhole-wheat “toast” & sliced sandwich breadwhole-wheat “toast” & sliced sandwich breadwhole-wheat “toast” & sliced sandwich breadwhole-wheat “toast” & sliced sandwich breadwhole-wheat “toast” & sliced sandwich breadwhole-wheat “toast” & sliced sandwich breadwhole-wheat “toast” & sliced sandwich breadwhole-wheat “toast” & sliced sandwich breadwhole-wheat “toast” & sliced sandwich breadwhole-wheat “toast” & sliced sandwich breadwhole-wheat “toast” & sliced sandwich breadwhole-wheat “toast” & sliced sandwich breadwhole-wheat “toast” & sliced sandwich breadwhole-wheat “toast” & sliced sandwich breadwhole-wheat “toast” & sliced sandwich bread

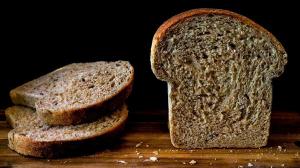
Here’s a 'recipe request' (which I sometimes entertain) from my sister STELLA who loves SLICED & TOASTED SANDWICH BREAD (particularly a healthy whole-wheat version with seeds).

SLICED SANDWICH BREAD is just one of those things I rarely buy and rarely consume, unless on rare morning occasions of “toast” in the morning with some butter and marmalade or honey (for a sweet breakfast) or with some olive oil and cheese and olives (for a salty breakfast).

SLICED SANDWICH BREAD, that I prefer to call TOAST (because I would never eat such a soft & mushy thing if it wasn’t pre-toasted to develop a bit of a grilled crust with some crispiness) is usually made with flour, water, milk, melted butter, sugar, salt and yeast and (sometimes) an egg.

Because my sister likes simplicity and is too busy to be bothered with too much “fanciness” & “fussiness” and prefers a recipe that she can remember by heart, I decided to simplify and reduce the number of ingredients as much as I could. 

When making this type of bread dough, you usually combine the milk with water and melted butter (and maybe an egg) and end up with a fat content of around 11%-12%. This is also what you get when you use 12% cream (or a diluted version with heavier creams mixed with water). This eliminates that one extra step.  

I also figured out that the ratio between the weight of the flour(s) and the liquid ingredients (cream & egg) should ideally be around 80% which means that for 375 grams flour, you’ll need 300 grams liquid (or for 500 grams flour, you’ll need 400 grams liquid, etc.). What happens if you want to make 1½ times this recipe ? Should you use 1½ eggs ? Yes, you can, or you can just use 1 egg and add an extra 30 grams water and/or cream. What if your egg is not extra-large or large and weighs only 52 or 55 grams, then just add 5 to 8 grams more water and/or cream or use all of the 2 eggs and subtract some cream … the dough isn’t that fussy (it’ll just be ‘eggier’) but you want to be at 80% at whatever the flour weight is !

Letting the dough rest and hydrate and kneading it several times with the warmth of your hands develops and strengthens the gluten (wheat protein) bonds and creates a dough that is more elastic and that retains its shape when rising and baking.

The shape and size of your loaf pan or tin (whether glass or metal or silicone) is also important ! The first time I made it, I didn’t make enough dough (and my yeast was old and not very active) so the dough didn’t rise upwards very much and didn’t create that nice ‘dome’ or ‘cap’ that rises much higher than the actual baking dish. Rounded corners and the rounded upper edges or lips of the baking mold are also important to avoid sticking and or ripping or tearing. I figured out that if you fill your loaf tin/mold with water up to the rim and record that weight (in grams), then you can figure out how much bread dough to make (ideally at 70% of the total maximum weight in water of your loaf tin). If it measured 1000 grams, then your dough (not including the seeds because they don’t expand) should be 700 grams, If it measures 1500 grams, then the dough should be around 1050 grams, if it measures 2000 grams, then you’ll need 1600 grams of dough.

Be careful with the rise. Doing a “poke-test” is a good way to know if the dough needs more time to rise, is almost ready or very ready and urgently needs to go into a very hot oven, before it collapses ! The ‘poke-test’ is all about simply and gently poking the dough with a floured fingertip and observing its reaction. Does it stay indented ? Does it spring back immediately ? For the second rise, Because the dough expands upwards (because it has nowhere else to go), be careful to brush melted butter on top of the dough too and to place a light (not heavy) kitchen towel on top. I actually have a larger container that is much higher than the loaf tin and has a lid so I put the whole loaf tin inside it to rise (without a towel). Yup, lucky me I have a set of metal enamelware baking dishes (with lids) that are great in the oven, even at very high temperatures.

Give the recipe a first try and adjust it later when you make it a second time. Perhaps you like it slightly saltier and/or sweeter and then you’ll also realize if you need to make more or less dough for that ‘perfect’ shape the next time. 

It stays soft & moist for several days and amazingly enough, when you toast it, it smells buttery and nutty ! And it’s for S-T-E-L-L-A and all of you too .

S is for soft & moist bread (with a nice crust too)

T is for tasty (a nice balance between buttery, nutty, salty & sweet)

E is for the elimination of uncertainty of how to make it (the instructions are precise)

L is for the lower number of ingredients that are easier to remember (it’s just ratios)

L is for the low level of difficulty (at least the second time around)

A is for again & again she will be making it (hopefully because she can often be quite demanding) . . . :)

whole-wheat “toast” & sliced sandwich bread

18.05.2018

1 loaf of 675 grams

ingredients

*ingredients (for a loaf tin that can contain 1 liter or 1 quart or 1000 grams of water) :

dry ingredients :

  • 375 grams (3 cups) mixed flours (125 grams or 1 cup whole wheat flour + 250 grams or 2 cups white all-purpose flour)
  • 20 grams (4 tsp) golden cane sugar (you can increase it to 30 grams or 6 tsp)
  • 10 grams (2 tsp) fine sea salt (increase to 2 ¼ tsp or 12,5 grams if you increase the sugar)
  • optional : 25 grams-50 grams (2 ½ tbsp-5 tbsp) mixed seeds blends for bread (sesame, golden & brown flax/linseed, sunflower, pumpkin, hulled millet, raw buckwheat) 

wet ingredients :

  • 240 ml (1 cup) light cream 12% fat content (or diluted 15% half & half cream or very diluted 30% heavy cream)
  • 60 grams (1 extra large) egg
  • 4 grams (1 tsp) dry active instant yeast (or 10 grams fresh yeast)

for brushing the bowl, dough & baking tin/mold :

  • 30-35 grams (3 tbsp-3 ½ tbsp) melted butter (and/or a mix with vegetable oil)

instructions

  • all ingredients should be at room temperature (between 20°C-22°C)

note : to figure out the correct quantity of ingredients to make this bread for your baking pan and for a successful rise & shape, fill your loaf pan with water up to the rim and record the weight, multiply that number by 0,70 (or 70% which is the average between 66% and 75%) and this should be the maximum total weight in grams of your ingredients for your loaf pan/tin, because the un-risen dough should only fill it up 2/ (66%) full to ¾ full (75%) and when it will rise a 2nd time, it will be 1 1/3  times up to 1½ times the height of your loaf tin/pan …

  • if using the seeds, soak them first in 2½ - 5 tbsp water (an equal volume of water to the seeds you’re using) for 15 minutes, then strain them and discard the water
  • combine the flours, sugar, drained seeds and salt and set aside

note : if you decide to use up to 50% whole wheat (and not 33% as I did) which is a flour that is higher in protein and thus absorbs more liquid, add about 5% more liquid (about 1 tbsp cream or water for this recipe quantity)

  • whisk together the egg(s) with the light cream (if the egg weighs less than 60 grams, then just add some water, to reach a total of 300 grams liquid) then add the yeast, stir and let rest for 5-7 minutes

note : if using 12% cream, use as is (the total 240 grams), if using 15% cream, dilute it with water (195 grams cream + 45 grams water), if using 18% cream, dilute it with water (160 grams cream + 80 grams water), if using very heavy 30% cream, dilute with more water (100 grams cream + 140 grams water) … it’s just math !

  • combine the wet ingredients with the dry ingredients with a wooden spoon until it becomes shaggy, let it rest for 10-15 minutes and then knead it for 2 minutes with your hands (if it’s sticky, sprinkle your hands with flour) and then let the dough rest for another 15 minutes and knead it again for 2 minutes
  • place the ball of dough in a large bowl brushed with melted butter (and/or oil), brush the top of the ball of dough too, cover with plastic film and let it rise until at least doubled in size (about 2-3 hours depending on temperature)

note : to avoid temperature fluctuations, I let the dough rise both times inside a cold oven with a drip pan of hot tap water underneath it (but not touching it), which raises the surrounding temperature from about 22°C room temperature to 27°C-30°C in the oven and speeds up the process

  • after the dough has doubled in size and seems ready, do the "poke-test"*, then flour your work surface, transfer and flatten out the ball of dough into a flatter rectangle approximately the length of your loaf tin and twice as wide, roll it up tightly (to the size of your loaf tin), brush the loaf tin abundantly with melted butter and/or oil, place the dough inside with the seam-side down, lightly flatten and even out the top surface, brush the top with cooled melted butter too, cover loosely with a kitchen towel (be careful that it doesn’t stick to the dough after it rises or just place it in a larger and higher container with a lid on top) and let the dough rise a 2nd time until about 3-5 cm higher than the loaf tin, like a dome or mushroom cap (from 1 hour to 1 ½ hours) and do the poke test* again

*note for the "poke-test" : coat your finger with some flour and poke/indent the dough once or twice, if it springs back quickly, let it rise longer, if it springs back very little or hardly at all, if it’s the 1st rise, then it’s ready to flip out and be re-kneaded and shaped, and for the 2nd rise, when you do the poke test and it springs back slowly and just a little, then start preheating the oven

  • before the 2nd rise is completed, preheat your oven to 210°C for 15-20 minutes with an oven-safe cup of water on the bottom (to evaporate and create vapor) 
  • place the bread (in its loaf tin) in the oven on the lower rack, lower the temperature to 190°C and bake for 20-23 minutes on the lower rack, then remove the loaf tin and the rack from the oven and place the loaf tin directly on the floor of the oven for 5-7 minutes (except for silicone molds), to create a slightly grilled crust on the bottom (total baking time is 27-30 minutes)

note : if the top of the bread is getting too browned, loosely place a piece of aluminum foil on top of it after 20 minutes of baking …

  • remove from the oven, let the bread cool down in its pan/tin for 5 minutes, then un-mold or remove it from the baking tin and let it cool completely on a cooling rack before slicing.
  • keep it fresh, wrapped up in a clean kitchen towel and it will stay soft for 3-4 days or you can put it in an air-tight bag for a softer and moister bread for 5-6 days or if you’d like to freeze it, you can slice it beforehand and put in a freezer bag for much longer …