- cover your metal cones in baking or parchment paper (make it longer than the cone, for easier removal)
- preheat the oven to 170°C
- melt your butter
- fold your round sheets of brik pastry in half and cut your sheets at the seam or in the middle
- brush both sides with melted butter (½ tbsp total) and then sprinkle on both sides with icing sugar (½ tbsp total) and powdered milk (½ tbsp total)
- carefully roll the half-circle of brik pastry around the parchement or baking paper covered cones (make it a bit shorter than the metal cone)
- optional : you can also slip on a second metal cone over the rolled brik pastry to keep it in place and not worry about the seam coming undone
- place 3-6 cones at a time, seam-side down, on a baking tray covered with parchment or baking paper and bake for 10-12 minutes (keep rotating and turning every 3-4 minutes to avoid burning the underside of the cones)
- remove from the oven when golden in colour and let cool 2 minutes
- while still warm and holding each cone gently with an oven glove, gently pull on the baking or parchment paper to release the pastry cone and let cool
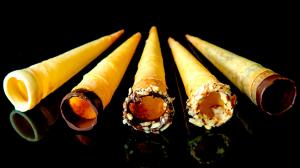
- optional : after the cones have cooled, melt some chocolate and dip the edges of the cones in melted chocolate or brush the insides with chocolate too and dip the cone edge in chopped nuts, etc...
Comments ? Questions ? Send me an email using the contact section below !